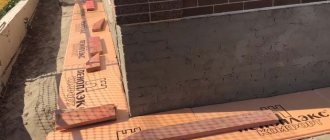
Sawdust, as insulation, is used to protect various surfaces: floors, roofs, ceilings, walls. In any case, thermal insulation is laid in a layer of some thickness; this parameter depends on the climate of the area and the type of material of the supporting structure. To reduce heat loss, different types of sawdust are used. First of all, they differ in fraction size and properties. If you need to choose insulation for making a working mixture, consider each option, taking into account the pros and cons.
Features and types of sawdust
The material is a by-product of the wood processing industry. Sawdust as insulation can be used in two ways:
- rot;
- shavings.
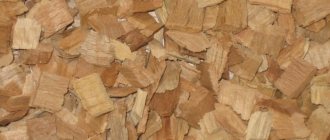
Smaller fractions are obtained by sawing. The result of this process is dust or wood dust. This material has a high filling density and is easier to compact. The parameters of the dust directly depend on the characteristics of the working tool (saw). The shavings differ in the size of the fractions - in this case they are larger (from 5 mm to 5 cm). This material is obtained by processing wood in several ways: drilling, planing.
Sawdust insulation is carried out using shavings from different types of wood:
- spruce;
- pine;
- oak;
- ash.
The cost of the material is low, which is due to the method of its production. Despite this, sawdust is still often used for a variety of purposes. The high popularity of the chips is explained by a large number of positive qualities, including excellent heat and sound insulation. However, we must not forget that this material is hygroscopic. For this reason, when choosing sawdust insulation, the type of wood is taken into account.
For example, oak fractions resist moisture better than others . This means that the material will not lose its properties upon contact with liquid.
Spruce, pine and ash are more susceptible to moisture. When choosing shavings to insulate an object, different thermal insulation technologies are considered:
- the use of carpentry waste in its pure form is the most suitable method, since in this case well-dried shavings are used, but in the process a lot of dust is generated, which contributes to the deterioration of the properties of the material;
- wood blocks - made from sawdust, copper sulfate and cement, this option is suitable for insulating a facility during construction, it is not used for the purpose of thermal insulation of houses that have already been put into operation;
- sawdust-based granules - contain carboxycellulose glue, antiseptic compounds and fire retardants, this material is an improved version of shavings, as it is characterized by excellent fire resistance;
- sawdust concrete – contains cement, sand, water and wood shavings;
- wood concrete - this material consists of sawdust, organic fillers and cement.
Using sawdust as insulation
Sawdust is an economical material, as it has a low cost; it is used as insulation for roofs, interfloor ceilings, floors, and ceilings. The composition of sawdust and lime is an environmentally friendly material, without the inclusion of synthetic additives, it has high sound and thermal insulation properties.
Lime is added to the composition for high-quality compaction and shrinkage of the material, and it also prevents the appearance of rodents. Sawdust is actively used as insulation for ceilings. Thanks to sawdust and lime, you can obtain high-quality insulation of walls and ceilings.
Advantages and disadvantages
If you are choosing insulation, information about thermal insulation alone is not enough - the pros and cons should also be taken into account, since the service life of the material depends on whether the chips meet the operating conditions. Positive traits:
- environmental friendliness;
- low thermal conductivity;
- soundproofing;
- acceptable price;
- simple installation technology;
- if the material is treated with fire retardants and antiseptics, the service life of the sawdust is extended.
Disadvantages include susceptibility to fire, hygroscopicity, and labor-intensive installation. The method of laying insulation itself is simple and does not require special skills or experience. However, this work takes a lot of time. In addition, wood shavings are susceptible to rotting, and rodents can build nests in them. Insects also live in sawdust. In addition, over time, this material dries out, which means it loses some of its properties. To eliminate the shortcomings, sawdust is mixed with clay, cement, lime or copper sulfate . This improves the properties of the material.
Sawdust and lime as insulation
This method is more suitable for thermal insulation of walls and partitions. Prepare well-dried shavings. To prepare the mixture you will need lime. To make insulation from sawdust with your own hands, the ratio of these components is taken as a basis - 10:1. It is permissible to use gypsum instead of lime.
To protect wall insulation from insect invasion, an antiseptic in an amount of 25 g/bucket is added to the mixture of sawdust and lime. This measure allows you to avoid subsidence and damage to wood chips by pests. The finished mixture is placed in the space between the walls. It is recommended to compact the material using moderate force. You should not be too zealous, as the chips may lose some of their properties.
Ceiling insulation
The choice of ceiling insulation method depends on the floor material.
The bottom of the concrete slab can be sheathed with ready-made blocks or plastered. The resulting thin layer, able to adhere to the stove, slightly reduces heat loss. With this method, it is problematic to use dry backfill. It is more effective to carry out insulation from the side of the next floor. Ceiling insulation work in a wooden house can be done in any way. For work, it is advisable to use softwood sawdust. They are lighter than others and contain a natural antiseptic - essential resins. Heavier, but moisture-resistant, sawdust from deciduous trees is used to decorate the ceiling of a bathhouse or sauna.
Surface preparation
Work before applying a layer of insulation to the ceiling includes:
- Cleaning the surface from dirt, debris and sharp elements that could damage the film of the insulating membrane.
- Hemming the ceiling beams with dry (mandatory) boards. Its fastening is carried out with two screws in each place, or nails driven in at an angle. To ensure secure fastening, adjacent nails are driven in different directions.
- Treatment of beams and cladding with fire-retardant impregnations.
- Filling the remaining cracks with construction foam for installation.
- Laying a layer of waterproofing.
The use of sawdust with cement
To prepare the mixture you will need cement and sawdust in a ratio of 1:10; 1 part of lime can be added. The amount of water is taken from the calculation of obtaining a mixture that does not crumble when compressed and liquid does not drain from it. Add 3 tbsp to a bucket of water as an antiseptic. l. copper sulfate. If you are insulating a wooden ceiling in a bathhouse, do not use vitriol - at elevated temperatures, harmful evaporation will be released from such a heat-insulating layer. The finished mixture is laid and compacted. After drying, a durable layer of lightweight concrete is obtained, which has good thermal insulation characteristics.
Using sawdust with clay
A mixture prepared from these components becomes an ideal filler and insulation for the ceilings of private housing construction, attic floors, and buildings for keeping animals (cow barn, chicken coop, etc.). Insulation of the ceiling with clay and sawdust takes place in two stages. The first stage is preparing a solution with large woodworking waste and laying it as a base 5-10 cm thick. The process of obtaining a raw mixture is standard. The laid out solution is compacted and a month is waited for it to dry completely. At the second stage, a mixture made from fine sawdust is prepared and placed on top. It is leveled flush with the wooden beams. After drying, cover up the cracks that appeared after drying.
The use of sawdust with lime and alabaster
The percentage of dry components in the mixture is 85:5:10 (sawdust: alabaster - building gypsum: lime). The mixed mixture is diluted with water in small batches due to the rapid setting and hardening of alabaster. This feature increases operating time, but the result is a durable coating that does not burn, is not a source of dust, and does not attract rodents. The mixture is laid out in a layer of up to 100 mm, its drying time is up to 4 weeks.
Sawdust with cement as insulation
Using lime and wood shavings, a material of increased strength is prepared. Cement is added to these components. If you need to know how much materials need to be used (their ratio, proportions), then the video will help you prepare the mixture correctly. The main feature of this technology is the thorough mixing of cement, sawdust, and lime. Thanks to this, the wood shavings will be well saturated with moisture in the future.
Components:
- 1 bucket of cement;
- 1 bucket of lime;
- 10 buckets of sawdust.
Prepare an antiseptic (25 g/bucket of water) and irrigate the bulk mixture. As a result, it should acquire sufficient density. You can check the readiness of the material by squeezing it in your fist. If the mixture retains its shape and no water is released, you can use sawdust with cement as insulation.
Blocks are made from the resulting material. Backfilling is carried out layer by layer. It will take 2 weeks for the insulation to dry completely. The blocks are then checked for voids. If any leaks remain, they are filled with the same mixture.
Thermal insulation of the floor with sawdust
Floor insulation with sawdust.
Before insulating the floor, sawdust is treated to prevent rodents and the development of microorganisms. To do this, you can use slaked dry lime and broken glass. The last protection should be treated with extreme caution; it is permissible to abandon it in favor of fluff and copper sulfate.
Insulating the floor involves some difficulties, expressed in the difficulty of filling up the sagging layer. Therefore, it is necessary to choose a method in which the composition will not decrease during operation. In practice, this indicates the need to use during the work a material that is not free-flowing or mixed with components, which allows for hardening to be achieved.
You can insulate the floor using a composition in which gypsum or cement is added to the sawdust. The proportions can be as follows: 85% sawdust, 5% gypsum, and 10% fluff. Due to the fact that gypsum sets almost immediately, extending the life of the mixture can be achieved by replacing gypsum with cement. There is no need to reduce the humidity level inherent in sawdust in advance; it is recommended to prepare the heat insulator in small portions.
If the sawdust is too dry, it is necessary to add water or milk of lime. You can analyze whether the composition is ready by squeezing it in your hand: if the lump does not spread, then you can begin to insulate the floor. When carrying out work in the room being used, the floor covering must be removed, the floors must be treated with an antiseptic and moisture-resistant mastic, and then you can proceed to installing the film backing. The mixture should be spread on top, which also needs to be compacted. The final layer height should be 10 cm (this is true for the first floor), whereas if the floor insulation is carried out in the area of the interfloor ceilings. This figure increases to 30 cm. Once the mixture has been compacted, it must be left for a period of two weeks to a month.
Return to contents
Sawdust concrete
This is a durable material whose composition resembles classic concrete, but fine sawdust and lime are added as fillers. The ratio of components may vary. The choice of option is made taking into account the requirements for the strength of the material. For example, to produce high-density sawdust concrete, you will need:
- 200 kg of cement;
- 200 kg of sawdust;
- 500 kg of sand;
- 50 kg of lime.
The number of components can be reduced/increased, but it is important to maintain the proportions. To influence the ability of wood chips to absorb moisture, they need to be soaked in lime milk, then in liquid glass. At the next stage, the sawdust is dried. This is necessary so that the wood chips do not contain moisture at the time of joining the components.
Preparatory work
Before use, it is recommended to treat sawdust with a wood antiseptic: copper sulfate or boric acid. Sequence of actions during preparation:
- Wood shavings must be dried.
- Then it is evenly moistened with an antiseptic. If necessary, use fire retardants. Thanks to this treatment, the quality of sawdust improves: fire resistance increases, the material becomes less attractive to insects and rodents, and fungus does not form in the structure and on the surface of the insulation.
- The sawdust is dried again.
- Before laying thermal insulation, waterproofing material is laid on the surface.
You can add lime or tobacco to the shavings. The use of a mixture of clay and sawdust makes the material more resistant to moisture. However, even in this case, you need to prepare it first.
Insulation with sawdust and cement
To insulate the ceiling, you can prepare a solution of sawdust and cement.
The ceiling can be thermally insulated using a slightly different technology, which involves the use of wet sawdust and cement. The first component must be specially prepared during the year of storage, and the moisture level of the material must be slightly exceeded. First you need to make sure that the sawdust is free from foci of bacterial development.
To insulate the ceiling with sawdust, you need to prepare a composition that has the following ingredients: wood shavings, water and cement in a ratio of 20:3:2. It is recommended to mix the solution in small portions, this will allow time to apply it before it hardens. Preparation must begin by mixing sawdust and cement, and then liquid must be gradually added to the composition.
The shavings must be treated in advance with protective compounds and mixed with lime and copper sulfate. Thermal insulation prepared using the described technology is poured between the beams onto the surface of the substrate or sand and sinks under pressure. You must install insulation with a thickness of 5-10 cm. The mixture acquires sufficient strength, so you can walk on it after hardening. However, it is recommended to install the floor from planks.
Return to contents
Dry method of laying sawdust
In this case, it is recommended to use large fractions of chips when filling the bottom layer. Using smaller sawdust or dust, the second layer is laid. When answering the question of how to make effective thermal insulation of a surface, it is recommended to follow the following diagram:
- Film waterproofing is laid on the logs.
- A rough plank floor is placed on top.
- Re-waterproofing is being carried out.
- Sawdust is poured, this should be done in layers. The thickness of each layer is 10 cm.
- The material is compacted.
- The sawdust is left to dry, for which a break in work is taken for 3-4 days.
- The material is protected from moisture on top, a clean plank covering is laid, and finishing is done.
Insulation of walls with sawdust is carried out not only using pure shavings, but also using mixtures based on lime and cement. In this case, drying the laid insulation will take longer: from 2 to 3 weeks.
The principle of using sawdust is the same when insulating walls, ceilings, and floors.
Insulation materials
248 votes
+
Vote for!
—
Vote against!
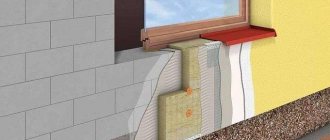
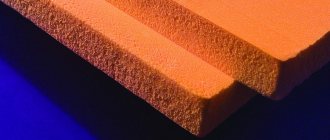
When thinking about building their own home, sooner or later every owner faces the question of choosing materials. And this applies not only to the construction of the structure itself, but also to the products from which the thermal insulation will be installed. The modern insulation market can offer a huge range of different materials, ranging from mineral wool to extruded polystyrene foam. But even the most expensive material does not guarantee complete heat retention, without unnecessary losses, while the budget will be significantly reduced due to its purchase. Many experts increasingly began to return to long-known, but gradually forgotten methods of thermal insulation of buildings. And first of all, we are talking about insulating the floor, ceiling and walls using sawdust or shavings. The article will talk about insulating a house with sawdust.
- Insulation with clay and sawdust
Features and types of sawdust
- Sawdust is the name given to particles of processed wood obtained by sawing; outwardly they look like fine dust.
- There is also a type of wood waste called shavings. The differences between them are in the manufacturing method; to produce shavings, wood must be planed or drilled; it also has a slightly larger size (approximate length 3-5 cm) than sawdust.
- Sawdust can also be of different fractions from 5 mm to 3 cm. The length depends on the technological processes of the woodworking industry, that is, what type of tool is used in each specific case.
- This is an environmentally friendly material, which, in addition to its low cost (on average, the price per bag ranges from 10-70 rubles, and they are often given free at sawmills) has a lot of other advantages. Among the more significant ones are the excellent thermal insulation and sound-absorbing properties and the relatively low specific gravity of the product. Most wood scraps are made from hardwoods such as spruce, pine or ash.
Ceiling insulation with sawdust
Issues of ceiling insulation should be addressed in private housing construction made of any material, be it a wooden house, or made of brick or foam blocks. After all, it is through the ceiling that significant heat loss occurs, on average about 20%. The most cost-effective way to insulate a structure is to lay a thick layer of sawdust.
Of course, stacking wood products is not an easy task. Before proceeding with the actual installation, extensive preparatory work will have to be carried out. First of all, this procedure is aimed at protecting against fire, since wood in almost any form is extremely flammable, that is, it ignites easily and has a long burning time.
Required materials and tools:
- sawdust of small and large fractions;
- sand, clay or slag;
- lime and copper sulfate (or boric acid);
- material for the substrate (corrugated cardboard or any other breathable materials, that is, with good vapor permeability);
- sealant and polyurethane foam;
- fire retardants, water repellents and antiseptics for wood (if the ceiling boards are not protected from mold and fungi, fire and water, then a comprehensive preliminary treatment should be carried out);
- construction stapler and staples for it.
Stages of work
All work begins with protecting the ceiling beams and boards from possible adverse factors. As a rule, high-quality buildings are built from processed material. But if such a procedure was missed for some reason, then it must be done now.
How to properly process
Wood structures are protected comprehensively, in compliance with the following sequence:
- antiseptic agents that prevent putrefaction and protect against insects;
- fire-retardant preparations for resistance to fire and elevated temperatures;
- water repellents, which prevent moisture from entering the wood structure and washing out previously applied products, while at the same time, water-repellent substances should not prevent excess moisture from leaving the boards.
It is necessary to ensure that all products are compatible with each other. It is advisable to choose a product line from one manufacturer.
Laying the substrate
- After the required protective work has been carried out, all seams, joints and existing cracks should be sealed with foam and sealant. Polyurethane foam is used in places with large gaps; small cracks and crevices are sealed with acrylic, polyurethane, thiokol or silicone-based sealants. Although the bitumen composition is good for roofs, it cannot withstand high temperatures, but in principle no one prohibits its use.
- It is not recommended to just foam all the cracks, since due to the special structure of the foam it ignites very quickly, which is extremely dangerous in cases of thermal insulation of the structure with sawdust.
- In addition to the cracks in the ceiling, all other holes in the roof structure are also sealed. This is necessary so that precipitation does not fall on the insulation or the thermal insulation layer does not rise during gusts of wind. At the same time, spaces should be left through which air will flow, such as small attic windows. This measure is needed to dry the laid sawdust, as well as to ventilate it.
- Do not forget about trimming the protruding parts of the foam flush with the ceiling beams, otherwise in the future there will be voids in these places through which heat will escape and cold will enter. When all the holes in the ceiling are sealed, the sealant and foam are dried and leveled, you can lay the underlay. This procedure is necessary to ensure that fine dust from sawdust does not fall off the ceiling and create additional dust in the house. After all, no matter how carefully all the cracks are sealed, the possibility of their occurrence cannot be ruled out, so you should be safe in advance.
- The substrate must necessarily have parapermeable properties, otherwise warm air and steam, rising upward, will be trapped between the boards and materials, forming unnecessary condensation, and in the future, the development of bacteria, mold and rot, that is, failure of the entire structure, is possible.
- Any cardboard will do, from old boxes, packaging, etc., as long as it is dry.
- Ceiling boards are cleaned of dirt and dust and cardboard sheets are laid on them in several layers. The material should be overlapped by 15-30 cm so that sawdust does not accidentally get between the seams. Next, all the joints of the substrate are secured with staples; it is advisable to place them at a short distance from each other and make sure that all layers of cardboard are captured. Thin cardboard is best laid in 2-3 layers. The edges in contact with the beams are also secured with staples, and then sealed around the entire perimeter with sealant or polyurethane foam.
Selection of sawdust and methods of filling it
- The wood-based material should be selected dry or slightly damp, with no odors unusual for wood. It is best to pre-treat sawdust with solutions of fire retardants and antiseptics. When the mass dries, you can add 10% lime (fluff) and a little copper sulfate (or borax) to it, mix the composition thoroughly.
- There are several main methods for installing thermal insulation from wood chip industry waste. Sawdust can be poured either in pure dry form or mixed with cement and diluted with water (or initially wet material is used). You should work with the cement mixture as quickly as possible, since it hardens within 30-60 minutes, after which it will no longer be possible to compact it thoroughly.
Dry method
- For the dry method, it is recommended to pour sawdust in two layers. The first consists of a larger fraction or chips, and the second is filled with the smallest products. This measure will help avoid unnecessary dust in the house, which can arise due to filling only small, fine-grained products.
- Also, large sawdust cannot be compacted properly, and this must be done so that the heat-insulating layer does not allow heat to pass through, but retains it and even releases it back into the room.
- The coarse-grained material is covered with a layer of 10-15 cm and compacted; a layer of fine sawdust of the same thickness is placed on top of it and is also carefully pressed and trampled down.
- It is allowed to wet the layer a little for better shrinkage. In general, insulation with a thickness of 20-30 cm is sufficient. It is also recommended to lay ash, slag (necessarily completely burnt and cooled), sand or clay on top. This, firstly, will help preserve heat, and, secondly, will prevent the appearance of rodents and the development of mold.
Insulation with sawdust and cement
- Method of installing thermal insulation from wet sawdust with cement. To implement it, you need to stock up on wood-based material that has been stored for at least a year and has a slightly damp composition. At the same time, be sure to make sure that the sawdust does not have pockets of bacteria, fungi or mold.
- The ratio of chips, water and cement in the composition should be as follows: 20:3:2. In this case, it is best to add the solution in small portions in order to have time to use it. The dry components (sawdust and cement) are thoroughly mixed, and then water is gradually added, while the mixture continues to be stirred.
Advice: do not forget that the shavings must be pre-treated with various protective agents and mixed with lime, as well as copper sulfate. If such procedures have not been carried out in advance, then all this should be added to the prepared solution.
- The prepared insulation is poured between the floor beams onto a substrate or a layer of sand and compacted. The result should be insulation up to 5-10 cm thick. The mixture sets well and after complete hardening you can move on it without fear; it will crunch a little, but should not sag.
- Once the insulation has been installed to allow normal walking on the surface of the attic, it is best to install a deck of boards or other hard material. If frequent movements are not planned, then it is permissible to leave the roof in this condition (that is, without covering the insulating layer).
Floor insulation with sawdust
Insulating the floor with sawdust is an environmentally friendly solution that is also beneficial from an economic point of view, at the same time, this method allows you to create conditions for comfortable living, reduce heat loss and reduce heating costs.
- The sawdust used for floor insulation, as well as in the case of ceiling insulation, requires preliminary treatment against rodents, insects and the development of pathogens. For this purpose, special ready-made products or slaked dry lime and broken glass are used. You just have to be very careful about the composition to which glass is added. Most often, such a remedy is abandoned in favor of lime fluff and copper sulfate.
- The difference between floor insulation and ceiling insulation is that adding insulator that has shrinked into the floor structure is extremely problematic. This means that you should take care in advance and choose a method in which the mixture will not decrease in volume over time, which will ultimately lead to heat loss. In practice, this means that when arranging protection for the floor from freezing, sawdust is most often filled with sawdust that is not free-flowing, but mixed with various components and subsequently hardened.
- In order to prepare such a composition, it is necessary to add gypsum or cement to the sawdust. The following proportions are recommended: 85% of the mass is sawdust, 5% gypsum and 10% fluff lime or lime dough (which requires twice as much as dry lime). Do not forget that gypsum sets almost instantly, in order to slightly extend the life of the solution, gypsum can be replaced with cement, which, although it has a short lifespan, is still longer than that of a gypsum mixture.
- There is no need to dry the sawdust before mixing; you should prepare the insulation in small portions and mix all the components thoroughly. If the sawdust seems too dry, add a little water or milk of lime to the mixture. You can check the degree of readiness by squeezing the prepared mixture in your hand - if the lump does not crumble or spread, but holds its shape well, then the mass is ready.
- If the floor is insulated in an already used room, then the floor covering is dismantled, the ceilings are treated with antiseptic primers and moisture-resistant mastics, and then a backing made of vapor barrier material or film is laid.
- The prepared mixture of sawdust is carefully placed on top of the substrate and carefully compacted; the layer height is about 10 cm for the first floor and up to 20-30 cm for the interfloor ceiling, which should be taken into account, since this is the height to which the floor on the second floor will rise.
- When the mass is thoroughly compacted, it must be left to harden; the ripening period ranges from 2 weeks to a month.
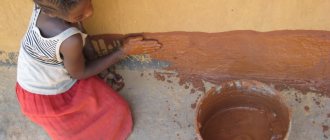
Insulation with clay and sawdust
- A method of insulating a floor using a mixture of sawdust and clay. This method involves covering the substrate with a waterproof material, for example, thick polyethylene film (150-220 microns). It is precisely because of this feature that this technique is not suitable for ceiling insulation, since the design of the thermal insulation of the ceiling must contain breathable materials that easily allow water vapor to pass through and do not form condensation, which invariably leads to the formation of mold and rot.
- The film can be glued to a concrete base or fixed to a wooden surface. This will help keep it in place without mixing. The substrate is laid overlapping to avoid leakage of the solution, since the mixture of clay and sawdust will be in a fairly fluid state.
- For kneading you will need clay and water. The consistency of the solution should resemble liquid sour cream. That is, for 100 liters of water, 5-6 buckets of clay (it is important to regulate the density, depending on the material). To mix the mixture with sawdust, it is best to use a concrete mixer or a construction mixer. It is recommended to knead gradually, take 1-2 buckets of liquid clay and add sawdust until the mass thickens.
- This type of insulation should be applied in a uniform layer up to 10 cm thick. You can press it with a flat, even object with a large surface area (for example, a wide wooden board or shield).
- It takes 7 to 15 days for the mixture to harden, depending on temperature and humidity. When drying, cracks may form on the surface, which can easily be repaired with the same clay. Also, if such insulation is expected to be present in a damp room, it should be covered with moisture-resistant mastic. Then you can lay the wooden flooring and use the floor.
Dry method of laying sawdust
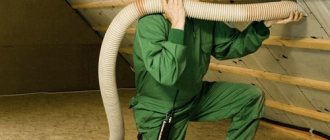
- It involves the installation of a raised floor. Sawdust is treated with fire retardants and antiseptics. This can be done by pouring protective solutions from a watering can onto the dry mass and mixing thoroughly so that every particle is covered with the product. After the insulation is prepared, the construction of the subfloor begins.
- To do this, all wooden products (joists, floor beams) are also coated with protective compounds. After that, a subfloor made of boards is installed on the base, and a layer of waterproofing is laid on it. Sawdust with a thickness of at least 10 cm is poured over the hydrobarrier. It is recommended to spill the sawdust with lime milk (lime diluted to a very liquid state). This will increase the resistance of thermal insulation to biological decomposition.
- It is worth considering that it is not allowed to insulate the floor with sawdust for subsequent screeding. Since such a layer has low strength and can cause significant shrinkage. Before applying the topcoat, you need to give time for excess moisture to come out, this is approximately 2-4 days. It is also possible that during the allotted time the sawdust will shrink by 2-3 cm. That is, in the future you should either add an additional layer, or at the backfilling stage you should immediately make its thickness within 12-14 cm, which is more optimal. In addition, slight shrinkage is possible over the next year.
- If the sawdust does not have good waterproofing and ventilation (the gap between the finished floor and the insulation layer), then they will soon lose their heat-shielding properties. Therefore, you need to think about this at the planning stage of the floor design.
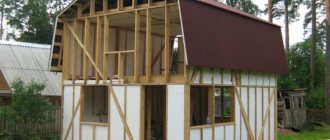
Insulation of walls with sawdust
- The most difficult procedure is considered to be wall insulation, since it is necessary to erect a frame, which is filled with sawdust and compacted manually. For laying in a frame wall, coarse sawdust should be prepared. If dry installation is intended, then the thermal insulation material must be well dried and not contain excess moisture.
- The mixture is prepared from wood chips, lime, gypsum or cement (since the gypsum-based material will have to be worked very quickly and prepared in small portions), as well as with the addition of antiseptics to the composition. The well-mixed mass is moistened, poured into the prepared frame and thoroughly compacted to avoid further subsidence. The gypsum or cement in the composition over time draws out all the available moisture and binds the mass into a monolith.
- Between the wall and the insulation there should be a waterproofing material with vapor-permeable properties. The effectiveness of insulation and the degree of shrinkage depend on the quality of compaction and the density of the backfill. In a poorly compacted layer, voids may appear, which means that heat loss will inevitably occur in these places in the future.
- The mixture is laid in layers of 20-30 cm and compacted, then a new layer of the same height is added and again carefully pressed and so gradually fills the entire space. The thickness of the insulation varies depending on the purpose of the building and its location (climatic zone). So, in a house for seasonal residence, a layer of 15 cm is enough, but if it is a permanent house, then 25-30 cm of wall insulation is required to maintain a comfortable temperature. The frame can be made of wooden boards with a section of 100x50 mm.
- The mass in the wall begins to harden after 1-2 weeks, and finally sets within a month. Throughout this period, it is advisable to maintain a relative air humidity of no more than 60-70% and a temperature within 20-25 degrees, as well as arrange regular ventilation of the room. If voids appear during this time, it is better to fill them immediately and only then proceed to further finishing of the walls.
Tips for insulating a house with sawdust
- In order for thermal insulation made from sawdust to serve as long as possible, not be attacked by rodents and to be reliably protected from the development of mold and bacteria, it is necessary to add 5-10% dry lime to the total mass.
- When insulating wooden buildings with sawdust, fire safety requirements must be observed. That is, in places where the chimney, chimney pipes or electrical wiring pass, it is necessary to take additional protective measures - arrange dividing areas in which instead of sawdust there will be any other non-combustible material, hide the wires in special boxes or metal tubes, line the locations of sockets and switches with non-flammable substances.
- If buying cardboard seems like an expensive procedure, then you can find a free way to deliver it. All you have to do is go to the nearest shops and supermarkets and ask them for unwanted boxes. In addition, you can get sawdust completely free of charge: ask your neighbors who are involved in construction, or go to the nearest sawmills and sawmills; it happens that they just give away the waste for pickup.
- A year or two after laying dry sawdust, they shrink a little, and for better insulation it is recommended to add a small additional layer.
- Fresh sawdust contains substances that prevent the cement from bonding well with water, which means that the prepared mixture will not have the necessary qualities. To avoid this, it is recommended to use sawdust that has rested for at least 2-3 months. If construction needs to be done urgently, then liquid glass can be added to the composition.
- If we compare sawdust with other insulation materials, then mineral wool is closest to them in terms of heat-insulating and noise-absorbing properties. The consumption of these two materials is approximately the same, but wood chips are a natural product, environmentally friendly and safe.
- The main disadvantages of wood chip products are their flammability and rodent damage. But these shortcomings are easily eliminated by using various protective drugs. In addition, for the same purposes, it is practiced to add lime, gypsum or cement to the composition, copper sulfate and boric acid. Such masses are too tough for rodents, and also do not ignite and do not support combustion.
- It is best to carry out work on laying thermal insulation in the summer season, since it is at this time that the mixture can be thoroughly dried, and, therefore, in the future, avoid problems with the development of all kinds of bacteria and mold formations.
- Sawdust varies in size, and the smaller it is, the more water will be needed to wet the mixture. And when fresh shavings are used, more cement will be required, which will significantly reduce the thermal insulation properties.
- The main advantages of wood processing products include availability, efficiency, durability and ease of installation.
- When purchasing sawdust, you should opt for medium-fraction material, since it is very difficult to work with small products due to the large amount of dust, and the large fraction does not have good thermal insulation properties. It is best if the waste comes from boards that have undergone preliminary chamber drying, but if such sawdust is very difficult to obtain and there is waste from logs of natural moisture, then the shavings must be placed under a canopy and slightly dried, without covering them in any way.
- To insulate a house, pine sawdust is the best option, as it already contains resin that repels bugs and rodents. For insulating other outbuildings, including bathhouses, waste from deciduous trees (for example, ash) is suitable, but it should be mixed with antiseptics or ash.
- It is better not to purchase sawdust that is too dirty; if there is debris, it is either selected by hand or sifted through a construction sieve.
- When adding copper sulfate or borax to the composition, do not forget that this is a toxic chemical substance and be sure to take all necessary safety measures, first of all, this applies to protecting your hands and respiratory tract.
- If the insulation mixture is being prepared for thermal insulation of a bathhouse, then it is better not to use copper sulfate, since when heated it emits toxic fumes.
Sawdust is used in the construction of residential buildings and commercial buildings. This is an economical and environmentally friendly material. It is used to insulate roofs, walls and floors, both in its pure form and with the addition of various components. We can say with complete confidence that this is an excellent way to increase heat and sound insulation, but only if certain rules are followed.
Conclusion
Of all the options, wood chips are the most environmentally friendly material. It has good thermal conductivity and sound insulation properties, which means it can be used along with technologically advanced analogues. If you correctly approach the improvement of the properties of this material, you can achieve increased fire resistance, moisture resistance, and extend the service life.
This becomes possible thanks to treatment with antiseptics and fire retardants. In addition, proper installation will help reduce the intensity of heat outflow from the room when using sawdust: layer by layer with a tamper.