For heating such premises as a temporary shed, change house, basement, utility room, workshop, etc. Usually you want to save as much as possible.
People may not be here all the time, the interior is very simple, and there may simply be no electricity.
There are many options, let’s consider the miracle of a diesel fuel stove (or “solar gas”, as it is also called) - a simple, effective and inexpensive, in all respects, heating method.
Principle of operation
Liquid fuel (this can be not only diesel, but also kerosene) enters an annular tank with fuel, where a fiberglass wick is rolled up.
The wick is soaked and burns, with a burner placed above it.
The gaseous mixture enters the combustion chamber (a system of cylinders with a large number of jumpers, holes, etc.), where it burns out layer by layer and evenly.
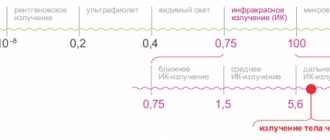
The design of the cylinders in the combustion chamber allows the use of convection and infrared heating mode. These stainless elements heat up to 800 °C and heat the air, infrared rays (length 620 -700 nm) are reflected from the mirror screen and directed into the room, and heat objects.
Combustion in this device takes place practically without open flame. You can determine whether the process is going correctly by eye.
The flame should not rise above the protective grill (both the grill itself and the wick can burn).
Iron sheet stove
In addition to a stove made from a gas cylinder, the stove can be made from iron sheets, which will look like this:
The drawing describes in detail how to make a stove from iron. The shape can be absolutely any. It is more convenient to cut out parts for the stove using a grinder, but in order to assemble the structure completely, welding will be required.
The first step is to weld the legs to the bottom of the oil tank. Then the bottom and tank are welded. Next, insert the top of the tank with a hole for the pipe, which should fit tightly into the tank. Do not forget that on the top cover, in addition to the hole for the pipe, it is necessary to make an additional hole into which diesel fuel or other fuel will flow and we make a cover for it. We also attach the pipe using welding.
We assemble the upper tank in accordance with the diagram and also weld it to the pipe, and another pipe is welded on its top. The manufacture of such a stove is very simple and, if you strictly follow the diagram, then its production will take a minimum of time.
A simple and effective diesel fuel stove is ready; now all that remains is to install it indoors and check the functionality and quality of the welded seams. By installing one of the types of stoves in your room, you will always be warm and at the same time, you will not have to spend money on fuel.
Diesel stoves
pros
- Provides independence from the supply of central heat sources (gas, electricity).
- Available fuel.
- Compactness.
- Ability to adjust intensity.
- The unit itself is cheap (only 2 - 3 thousand rubles).
- The surface is designed so that you can place a container of food or tea and heat it up (but not cook!).
- No open flame, no chimney required.
An undeniable advantage is the mobility of the furnace. It can be easily transported from room to room (the weight of the device is less than 6 kg, there is a handle), taken on a trip, to the dacha, fishing, to dry the cellar with it, etc.
With low fuel consumption (about 200 - 400 grams per hour), the power of the device is very serious - 1.8 - 5 kW.
If you consider that you can fill the tank with 2–2.5 liters of fuel at a time, then the operating time on one fill will be 5–12 hours, depending on consumption.
Minuses
- Not suitable for residential premises as a permanent heating device due to the unpleasant odor and smoke entering the room.
- The need to replace wicks (every few months, or every 5 - 7 tanks of fuel).
- The need for periodic cleaning of the burner.
Diesel and kerosene heaters
Delivery within Belarus is carried out by cash on delivery through RUE "Belpochta", delivery time is 2-3 days.
Cost of delivery:
1. In Belarus - 10 rubles
2. In Minsk - 5 rubles
Mobile and stationary heating devices.
They are used for heating residential and non-residential premises and cooking.
They run on liquid fuel - diesel fuel and kerosene. Power from 1.8 to 5 kW.
In the winter season, warmth in production premises is important. It is quite natural that labor efficiency is significantly reduced if your fingers are already red from the cold and you can only think about how good it is at home. The solution to this problem has long been provided in stores, and is called heaters. But we are not talking about low-power household equipment, but about large production units. This category includes diesel fuel heaters, which are the optimal and most profitable option in their category.
These diesel fuel heaters are powerful fan heaters that heat the air at high speed. They can also be used for intermittent heating.
Thanks to mobility, fuel economy, versatility and a large number of functions, diesel heaters have become the most popular among all options.
If everything is clear with industrial heating, then what to do in cases where such power is not needed. For example, for working in a garage in winter, a heat gun is simply impractical, since the room is small and such a powerful flow will create a sauna, not a comfortable temperature. In this case, solar gas , which is a less powerful heater designed for domestic needs, will come in handy. The scope of application extends to heating residential and non-residential premises, cooking or heating food.
This option is much more profitable than traditional portable batteries and fan heaters. Operation does not require the installation of chimneys, and its low weight allows it not only to move the equipment from one room to another, but also to transport it by car.
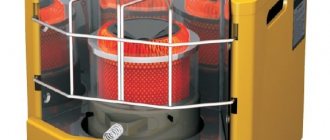
Solar gas consists of a metal body, a reflector, a fuel tank, and a receiving bowl. The fuel tank most often used is 2.5 liters. The principle of operation of the device is that fuel enters through a special channel, wets the wick, which lights up and releases heat and light. The heating level is adjusted thanks to the adjustment function. Diesel or kerosene is used as fuel. Many people recommend the use of kerosene as a cleaner fuel that produces more heat and less unpleasant odors. Once the tank is filled, the equipment operates for about 14 hours.
Diesel fuel heat guns are characterized by a high level of reliability, performance and long service life. The equipment is insensitive to temperature changes and accidental shocks. Most heaters can operate in difficult conditions, such as those found in greenhouses and greenhouses. Almost all modern equipment is equipped with additional automatic safety equipment, due to which automatic shutdown is triggered in emergency situations. In this way, breakdowns can be avoided and a high level of safety can be added to the benefits.
If you need a high-quality, reliable and powerful heater, then choose diesel fuel heaters. For home use, it is advisable to stick to solar gas.
Miracle oven design
Solar gas is a small rectangular body, in the rear of which there is a fuel tank and a removable “wick bowl” tank in the center. These two containers are connected according to the principle of communicating vessels. A valve is installed on the outlet pipe that regulates the fuel supply. A wick-burner on a cylindrical base is immersed in the tank (the same principle was used in kerosene lamps).
An adjusting screw is installed on the burner, with which control is carried out. Behind the burner is a reflector.
Miracle diesel stove - design
Instructions for making a miracle oven
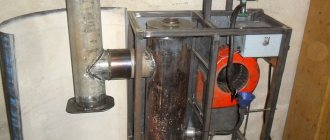
The easiest way to make a homemade diesel stove is from a drip-type gas cylinder, since almost everyone has one. The drawing and its explanation show in detail what the structure will consist of.
- Waste gas cylinder.
- A steel pipe with a diameter of 100 mm and a thickness of 5 mm through which gases will be discharged.
- A pipe with the same characteristics for a heat exchanger.
- 4 mm steel sheet for the partition between the combustion chambers and the evaporation chamber.
- Another sheet of the same parameters for a canopy over the heat exchanger to increase the heating of the pipe.
- Evaporator bowl.
- Coupling.
- 0.5 inch pipe for supplying fuel to the combustion chamber.
- A ball valve with which the fuel supply will be regulated.
- Fireproof pipe for fuel supply.
- Reservoir for storing waste. Any cylinder with an integrated needle valve can be used as a container.
- Air flow swirler. You can use 2 corners 55 mm wide, which are welded together.
- Duct fan.
Assembly steps
Working with the tank
To safely work with the cylinder, it is necessary to drain the remaining gas and condensate. To do this, you need to open the valve and coat the hole with soap foam. If the foam stops bubbling, it means that all the gases have escaped. Then we twist the valve. On many cylinders they are not removable. Then you need to drill a small hole in the bottom and drain all the existing liquid. After this, the container must be rinsed with water.
Then you need to make two holes in the cylinder: the first - 200 mm, the second - 400 mm, with a 50 mm jumper between them. The photo shows how they should look. We do not throw away the cut parts; they will be useful as doors that will need to be welded onto the hinges to the cylinder.
Separating the cameras
We proceed to the manufacture of a jumper that will separate the combustion chamber and the heat exchanger. To do this, we need a sheet from which we need to cut a circle so that it matches the internal diameter of the cylinder (approximately 294 mm). Then in the circle itself, in the middle, we cut out another hole for the pipe. The hole must be at least 100 mm.
Making a burner
We take a pipe 20 cm long and 4 mm thick, and drill holes with a diameter of 19 mm in one part (bottom). After drilling, all burrs must be cleaned from the inside, otherwise soot and soot will settle on them, which will lead to a narrowing of the internal diameter of the burner.
A ring cut from a sheet is put on this pipe and welded well so that there are no holes.
After this, the structure must be installed inside the cylinder and also welded around the entire perimeter.
Making an evaporation bowl
As a bowl, you can take any container that has thick walls and does not deform at high temperatures, but the easiest way is to use an old brake disc. The main thing is that it is made of heat-resistant materials, such as cast iron. You need to weld the bottom and lid onto the disk.
A fitting is welded on top of the lid, which will be combined with the burner pipe using a coupling of the largest size.
Making a fuel supply system
To make a fuel supply system, you need to insert a 0.5-inch pipe into the hole at an angle of 40 degrees and weld it to the body of the miracle stove. It makes no difference where to drill a hole for the pipe, since the bowl can be turned in any direction.
To mark the reach distance, the coupling must be lowered onto the end of the pipe.
We cut the pipe using a grinder so that there is a spout at the end. This shape will facilitate more convenient fuel flow.
A valve must be screwed to the tube, which is intended to be used in the event of a breakdown, to shut off the fuel supply.
Making a heat exchanger
The pipe must be cut horizontally into the structure body. Then you need to weld a steel sheet onto the top of the pipe, this will be a reflective screen.
In order to circulate air through the heat exchanger, a swirler is used, which must be inserted into the heat exchanger pipe. You can make a swirler from 2 squares welded together, which should be 300 by 50 mm in size.
The homemade diesel stove is ready, and in the end you should end up with a design like this.
They also make a stove using diesel fuel or waste. To do this, you only need to change the fuel.
Ignition
It is better to ignite outdoors, and only then bring the working device into the house (this will avoid unpleasant odors in the room).
If the stove has not been used for a long time, it must be cleaned before starting ignition. The grate, burner, tank on the rear wall are removed, and the entire fuel unit is pulled out. All parts are cleaned, the reflector screen is rubbed.
It is very important to install the device strictly horizontally, otherwise it will be difficult to achieve uniform burning of the wick along its entire length.
Then ignition:
- Fuel is poured into the removable tank.
- A new wick is installed in the burner (twisted into a ring at the bottom of the burner).
- The burner and grate return to their original place.
- The valve unscrews slightly, which allows fuel to access the wick.
- The front panel opens and acts as a door.
- The edge of the rolled paper is lit and brought to the burner from below.
- When the fuel burns well and the flame rises above the grate, the valve closes completely (the red-hot bottom of the burner will indicate that sufficient heating has occurred).
- After waiting until the flame begins to go out, turn it off again, but this time to the intensity that you would like to achieve.
When you need to turn off the stove, turn the valve all the way.
While the user has little experience in handling the stove, it is very difficult to achieve even burning of the wick (this can take more than half an hour).
But if you have experience igniting, but still cannot get a blue flame throughout the entire wick, this may be one of the following problems:
- Uneven surface, tilt of the oven.
- The burner cylinder has not yet warmed up completely.
- The wick is worn out (it burns slightly every time and the more it is used, the more damaged it becomes).
You can try to extend the life of a worn wick by simply turning it over, or trimming the burnt edge with scissors. To make the wick last longer, it can be periodically washed in kerosene.
Precautionary measures
A heating device of this type cannot be used in bedrooms during rest periods, or in places where there is no or very poor ventilation! Diesel fuel emits acrid smoke, which can enter the room during ignition and extinguishing. The air exchange volume should be 20 m3 per hour or more.
At the same time, this should not be a drafty area.
Stove "Solyarogas"
Do not place the stove close to walls, furniture or other objects, especially if they are made of flammable materials. The distance around the device is at least 50 cm on each side.
Do not allow any liquids, including water, to come into contact with a burning stove.
It is not recommended to experiment with fuel. The manufacturer has already done this at the enterprise.
The results of such experiments can be read in the instructions, which list all brands of fuel compatible with this model.
Advantages and disadvantages of kerosene heaters
Like any other equipment, a kerosene heater has its positive and negative sides.
All the advantages of using kerosene heaters:
- autonomy of the device;
- almost complete absence of smell and smoke during operation;
- excellent mobility;
- durability of wicks;
- a large number of options for electric models;
- The appliance can be used to heat and cook food.
Disadvantages of kerosene heaters:
- vapors and the smell of used fuel during ignition and extinguishing of the device;
- high fuel prices;
- flame.
DIY diesel oven
Making any heating device at home is a costly and time-consuming process. Calculations, metal cutting, welding and other operations are advisable only if their cost is significantly lower than the cost of factory analogues.
However, in the case of a miracle stove, which costs 2-3 thousand rubles, the costs are clearly not justified!
Homemade stove
But some improvements to the factory model of the miracle stove can be done with your own hands. Cheap solar gases have already been popularly nicknamed “Constructors”, from which you can complete an excellent liquid fuel stove!
"Chimney"
Solar gases are used in non-residential or well-ventilated areas. But if you need to heat a place where people sleep on a hike, they are not suitable, since they still smoke.
To install a miracle stove in a tent or minibus, craftsmen equip it with a homemade chimney. A funnel from a drainpipe is placed on the top part (upside down), and several pipe bends are connected to it and led out into a window or hole in the tent.
Convenient combustion adjustment
The rubber seal must be installed on the needle valve stem, where there is a technological groove near the thread.
Preventing kerosene evaporation
To do this, the receiving cup must be closed (this is exactly how kerosene gases have always been made). You will need a small metal plate 1 mm thick and three screws. A 20 mm hole is drilled in the plate in the place where the spring valve will pass. The plate is attached to the side with screws. A sealing rubber is installed between the valve and the cover.
A Russian stove is a complex design, and most often, if someone wants to build one in their home, people turn to stove makers. It’s possible to build a Russian stove with your own hands; you just need to understand the intricacies of stove construction.
See how stove heating with a water circuit works here.
Despite the development of technology, including in the field of construction, the principles of constructing stoves have remained the same and clay is used as a solution for the stove. Using this link https://microklimat.pro/otopitelnoe-oborudovanie/pechi/glina-dlya-kladki.html we will reveal all the secrets of mixing the correct clay solution and consider ways to test clay for fat content.
Reviews
Consumers love miracle liquid fuel stoves. People find them practical and convenient. Used to heat garages, barns, and other household items. buildings
They note, however, that using a stove as a stove is not effective; cooking “is the same as using a radiator.” Food heats up much faster if you light a fire or use a burner with an open flame while camping. Another note is about the fuel supply control system.
Penza Solar Gases use a primitive, very inert method. In addition, the tap is not equipped with seals; air is sucked in, which leads to combustion instability. For example, Japanese liquid fuel stoves operating on the same principle are much better designed and easier to regulate.
One of the advantages is the rapid heating of the room, the smell during operation is practically not felt.
Other stove options for non-residential premises
Waste oil burners
They attract those who have access to this type of fuel. Although it is not so easy to make a burner, you need to use it with great care, but it gives its efficiency and does not lose popularity in its circles.
Long burning stoves
These are small stoves that allow you to create air heating.
They run on good quality solid fuel.
Special convection pipes on their sides draw in and warm the air, accelerating its circulation in the room.
Well-known models of this type: Buleryans, Brenerans, Butakovs, Termofor, Teplodar, Burzhuy-k, Besser.
So, whether a stove is good in comparison with other options can only be judged if you select two units for the same purpose.
For example, electric heaters can produce a third more power for the same cost, and some boilers can run on waste wood, which is much cheaper.
However, kerogen gas (and modern solar gases are those same kerogen gases) was not developed with the goal of reducing costs to a minimum, but as a portable and compact travel option. And I must say, it turned out to be a really convenient and safe stove.
Bubafonya is one of the variations of a long-burning stove. Making a Bubafonya stove does not require a lot of materials or time, so many craftsmen prefer to assemble the structure themselves rather than buy a ready-made version.
What is a muffle furnace and how to make it yourself, read on.