Pipeline depressurization is an extremely undesirable phenomenon that can lead to very serious consequences.
To minimize the risk of such incidents, it is necessary to ensure that the system is sufficiently reliable before putting it into operation.
A special procedure will help you do this - pressure testing of the pipeline.
Pressure testing with air and water - what is it?
The essence of pressure testing is to fill a certain system with a closed volume - a pipeline, container, machine or mechanism - or its isolated section with a medium whose pressure is 2 - 3 times higher than the working one and almost corresponds to the maximum permissible value (the value of the test pressure for each specific case is set by the appropriate norms).
If the object passes this test, it is considered suitable for use.
Otherwise, places where the system has leaked are identified and repaired.
To create the required pressure, either a special pump for pressure testing pipelines, the so-called pressure tester, or a standard one, for example, a circulation pump in a centralized heating system, is used.
Water is usually used as a working medium, but if for one reason or another its penetration outside the tested system is unacceptable, pressure testing is carried out with air. In this case, leak locations are more difficult to detect.
Pressure testing is a fairly serious undertaking and must be carried out by a specially trained, certified employee. For municipal and industrial enterprises this rule is mandatory.
Upon completion of the procedure, a Certificate of hydropneumatic testing of the system (pressure testing of the pipeline) is signed, indicating the date, pressure value, holding time and other information.
As for private housing, the decision here is in the hands of the homeowner. Many people undertake crimping on their own, but it is still better to entrust this work to a professional.
Strength and tightness tests
A preliminary check of communications for strength and tightness indicators is carried out in the following sequence:
Strength test. To do this, a test, increased pressure is created in the pipeline and maintained for about 10 minutes. As mentioned above, the pressure should not be allowed to decrease during exposure. As a rule, the test is violated if the pressure drops by more than 0.1 MPa. After time, the test pressure is reduced to standard values and maintained by continuous pumping of fluid. After this, a structural inspection is performed, which is aimed at identifying damage. If no defects are found, a second strength test is performed. If deformations are detected in the pipeline structure, they are eliminated and retested. Individual parts of the pipeline communication are checked at different times. The duration of the hydraulic test cannot be less than 10 minutes.
Checking for leaks. After the communication has passed the strength test, the pipeline is checked for leaks. The tightness is checked as follows:
- The start time of the check is recorded.
- The initial liquid level is determined in the measuring tank.
- When the first two points are completed, monitoring of the decrease in pressure in the structure begins.
During the test, strict pressure control is necessary; its indicator should not change throughout the entire exposure period
When hydraulic testing pipelines, this sequence must be strictly followed.
When is crimping necessary?
Pressure testing is performed in the following cases:
- Before putting the system into operation for the first time.
- After repairing the pipeline or replacing any of its components.
- After a long period of inactivity (a typical example is heating pressure testing after the summer season).
- If a scheduled check of the system status is provided. For example, sewerage from polymer pipelines is subjected to periodic pressure testing in order to check their integrity.
- Also, pressure testing should be carried out after flushing the pipeline, especially if aggressive chemicals that can weaken the walls of pipes and fittings were used. The same applies to sewer cleaning, since during this operation the joints of the pipelines may be damaged.
There is a special type of pressure testing that is applied to water wells. This check allows you to determine whether the perched water is getting into the wellbore from where water is drawn.
How is testing done?
When testing equipment, test pressure is used, the force of which is 25-50% higher than the working pressure. The specific test pressure is calculated separately for each system, component or equipment being tested. This is a responsible process that should also be trusted to experienced professionals in this field.
Professionally engaged in hydraulic and pneumatic testing of technological systems, units and individual elements. The work is carried out using special equipment of our own design, ensuring high safety and efficiency of the work carried out.
Preparatory measures for crimping
Before starting crimping work, you must perform the following steps:
- The pipeline system under test is inspected for obvious defects (missing elements, rusted areas, etc.). Identified violations are eliminated. If the system is filled with any substance that cannot be used for testing, for example, coolant in a heating system, it must be emptied.
- Next, according to the rules, the pipeline is flushed. This operation will remove scale, rust, and organic and inorganic deposits from the pipes. Flushing can be carried out in various ways, some of which require the use of a compressor. According to the rules, upon completion of this procedure, the quality of its implementation should be checked by cutting out a section 0.5 m long in an arbitrary place of the pipeline and assessing the condition of its internal surface.
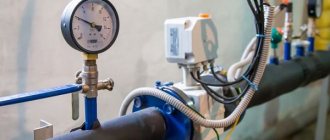
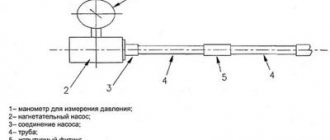
- The preparatory stage ends with the installation of a check valve and a pressure gauge, if they are not part of the injection device. A check valve is necessary to retain the working medium in the system.
When testing heating systems of apartment buildings, work on preparing the heating unit is carried out separately from the entire system and after it. This is due to the fact that this unit is tested with a higher pressure value.
Why and when to carry out hydraulic tests?
Hydraulic testing is a type of non-destructive testing that is carried out to check the strength and tightness of pipeline systems. All operating equipment is subjected to it at different stages of operation.
In general, three cases can be distinguished in which tests must be carried out without fail, regardless of the purpose of the pipeline:
- after completion of the production process for the production of equipment or parts of the pipeline system;
- after completion of pipeline installation work;
- during operation of the equipment.
Hydraulic testing is an important procedure that confirms or refutes the reliability of the operating pressure system. This is necessary to prevent accidents on highways and preserve the health of citizens.
The procedure for hydraulic testing of pipelines in extreme conditions is being carried out. The pressure under which it passes is called the test pressure. It exceeds the usual operating pressure by 1.25-1.5 times.
Features of hydraulic tests
Test pressure is supplied to the pipeline system smoothly and slowly, so as not to provoke water hammer and accidents. The pressure value is determined not by eye, but by a special formula, but in practice, as a rule, it is 25% more than the working pressure.
Hydraulic tests reveal weak connections
The water supply force is controlled on pressure gauges and measurement channels. According to SNiP, jumps in indicators are allowed, since it is possible to quickly measure the temperature of the liquid in a pipeline vessel. When filling it, be sure to monitor the accumulation of gas in different parts of the system.
This possibility should be excluded at the initial stage.
After filling the pipeline, the so-called holding time begins - a period during which the equipment under test is under increased pressure. It is important to ensure that it is at the same level during exposure. After its completion, the pressure is minimized to operating condition.
No one should be near the pipeline while the test is being carried out.
Personnel operating it must wait in a safe place, as testing the system's functionality can be explosive. After the process is completed, the results obtained are assessed in accordance with SNiP. The pipeline is inspected for leaks, metal explosions, and deformations.
Crimping machines, pumps for crimping pipes
First of all, the pumps used for pressure testing differ in the design of the discharge mechanism.
On this basis they are divided into the following groups:
- Piston.
- Vane-rotor.
- Membrane.
For crimping systems with a small volume, for example, heating circuits in private homes, you can purchase an inexpensive and easy-to-maintain manual crimping machine.
Using such a device, the operator will be able to pump up to 3 liters of working fluid per minute into the pipeline. For a multi-storey building, this option, of course, will be unacceptable; here you will need a crimping machine with an electric or internal combustion engine drive.
The most popular is the domestically produced manual crimping machine UGO-30, designed for a maximum pressure of 30 atm. The cylinder volume is 36 cubic meters. cm, force on the handle – 2 kg. Equipped with a 16 liter tank.
For more serious tasks, manual two-stage pumps UGO-50 (up to 50 atm) and UGI-450 (up to 450 atm) are intended.
Manual hydraulic crimping machine UGO 30
Among electric crimpers, units from the German company Rothenberger are known, for example, the self-priming model RP PRO II, which develops a pressure of 60 atm and a flow of 8 l/min. The drive power is 1.6 kW.
Ridgid products are also highly rated, for example, model 1460-E. This crimping machine develops pressure up to 40 atm.
The autonomous water supply system will operate uninterruptedly only if the pressure switch for the hydraulic accumulator is correctly configured. Let's consider the principle of operation and the procedure for adjusting the relay.
Read how to make a drainage well with your own hands here.
Who doesn't dream of a swimming pool in their country house? Such a custom-made design will be expensive, but you can save money and build a pool yourself. Here https://aquacomm.ru/vodosnabzenie/zagorodnyie-doma-v/bassejn-na-dache-svoimi-rukami.html you will find instructions for building a concrete reservoir.
Testing
Testing for strength and tightness using the hydraulic method is carried out in several stages. At the first stage, a press or hydraulic pump is connected. Next, the team installs pressure gauges, and the structure itself is filled with water. It is important to ensure that air is displaced from the system; for this, the vents are left open. If water gets into them, it means there is no air left.
As soon as the system is completely filled with liquid, its surface should be inspected for cracks, leaks and flaws that may occur around the perimeter in the connecting elements. The test for strength and tightness at the next stage involves applying pressure during prolonged exposure. The load can be gradually reduced until the indicator values reach the standard level. This will allow you to re-examine the state of the system. At the next stage, the pipeline is freed from water, and the equipment can be disconnected and removed.
How it's done?
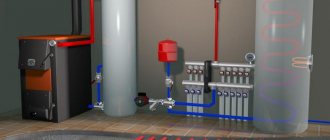
The general scheme of hydropneumatic tests is as follows:
- The part of the system being tested is isolated by shutting off the shut-off or control valves (the sewer pipes are closed with rubber plugs or wooden plugs wrapped in rags).
- Next, the system is completely filled with water. In the heating system, air is released through air vents installed at the very top.
- A pressure testing pump is connected to the pipeline, which pumps a certain amount of working fluid into the system, creating the pressure required by the test regulations.
- When the required pressure is reached, the pressure tester switches off. In this case, the observer records the readings on the pressure gauge.
- The system remains under pressure for a certain period of time. The exposure time can range from 0.5 hours (for heating systems) to 6 – 8 hours.
- After the appointed time has expired, the observer takes readings from the pressure gauge again. If the pressure differs from the original value, then there is a leak in the system that should be found and repaired. After this, crimping is performed again.
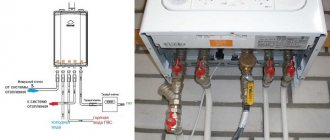
Pressure testing of heating system with air
The following connection points are usually used:
- For heating systems: a special valve on one of the radiators, or a drain valve on the elevator unit (in centralized systems).
- For water supply systems: one of the connections to a cold or hot water tap.
- For the sewerage system: any of the revisions, usually installed in increments of 40 - 50 m.
If the heating system has been tested, the Hydropneumatic Test Report is signed by representatives of the heating network and the organization providing heat supply. Next, the inspector checks the coolant for hardness.
Preparatory work before hydraulic testing of pipelines for strength
Before carrying out hydraulic tests, careful preparatory work should be carried out. To do this, the structure is divided into divisions, then its external inspection is carried out. At the next stage, the technical documentation is checked. Drain valves are fixed to the divisions, and air valves and plugs are connected to them. A temporary pipeline line is installed from the pressing and filling devices. The section being tested is disconnected from the remaining divisions of the pipe; plugs with shanks are used for this purpose.
Equipment and apparatus must also be disconnected. It is unacceptable to use complex wire shut-off valves for this purpose. The strength test involves connecting the pipeline to hydraulics, among such devices the following should be highlighted:
- air networks;
- pumping stations;
- compressors.
All this allows us to provide the pressure necessary for testing. Tests must be carried out under the guidance of a master or manufacturer, taking into account the requirements of technical documentation, design papers and instructions. It is important to comply with safety precautions and state technical supervision regulations.
SNiP
Data on the procedure for performing pressure testing of pipelines, technological diagrams of this process and safety precautions are contained in the relevant sections of the following SNiPs:
- SNiP 3.05.01-85 (dedicated to internal sanitary systems).
- SNiP 41-01-2003 (outlines the issues of organizing heating, air conditioning and ventilation systems).
- SNiP 3.05.04-85 (applies to external drainage systems).
The method of pressure testing of pipelines of industrial enterprises is specified in industry standards.
Among other things, these documents establish the value of the test pressure. It depends on the material of the pipeline, the thickness of its walls (the minimum value is taken), the difference in height between the uppermost and lower elements of the system and other factors. Most often, the pressure during hydropneumatic tests is developed to the following values:
- in pressure pipelines (water supply): 10 – 15 atm.;
- cast iron sewerage: 1.5 atm.;
- non-pressure polymer pipes: 1.5 – 2 atm.;
- heating systems in apartment buildings (with cast iron radiators): 2 – 5 atm. (according to SNiP - at least 1.5 working pressure);
- input node (in centralized systems): 10 atm.;
When pressure testing a heating system in private homes, a pressure of up to 2 atm is sufficient. (there is no point in pumping higher: the emergency valve is usually set to this level).
Work methodology
A hydraulic strength test is also carried out to determine the density. During test experiments, the pressure value is set in accordance with the design documentation in kgf/cm2. As for steel structures, their operating threshold should not exceed 4 kgf/cm2, with an operating temperature of the system exceeding 400 °C. The pressure value in this case will be equal to the limit from 1.5 to 2.
If the working threshold of a steel structure exceeds 5 kgf/cm2, then the pressure value will be equal to 1.25. Sometimes this value is determined by a formula that assumes the sum of the working load and the value of 3 kgf/cm2. If we are talking about products made of cast iron or polyethylene, then the pressure value will be equal to 2 or more. As for non-ferrous metal alloys, the figure is equal to one. To obtain the required loads, the following types of presses are used:
- operational;
- drive gears;
- mobile plunger;
- manual (piston);
- hydraulic.
Price
The cost of crimping depends on several factors:
- length (internal volume) of the system;
- the age of the system and the condition of its constituent elements (amount of rust and dirt and salt deposits);
- type of equipment used.
Prices from different performers, even within the same city, may differ by 2–3 times. Private teams and craftsmen charge the cheapest for their services.
On average, for flushing and pressure testing the heating system of a building with an area of 400 sq. m (two-story) performers charge from 7 to 15 thousand rubles. As practice has shown, if you know how to bargain, you can agree to complete this amount of work for 4–5 thousand rubles. The work will be completed in 1 – 2 days.
The same work in a building of 5 thousand square meters. m (5 floors) will cost from 30 to 80 thousand rubles.
Some performers indicate prices per unit of volume (150 - 250 rubles / cubic meter) or time (500 - 1000 rubles / hour).
If you want to install the washbasin yourself, be sure to take care of connecting the water seal. Water seal for sewerage: types, purpose and installation features.
You will learn about the types of antiseptics for cesspools in this review.